Tips for shooting Fall Colors

[perfect_quotes id=”822″]
I will admit it, that the organization of these ideas came from Nikon website. However, these tips are universally true and are not limited to just Nikon.
These tips for shooting fall colors is based on the experience of myself and others that we take to fall colors shoots.
- IMITATION
If you like the way someone’s photos turn out watch how they take the photo, or try and figure out how they did it. This can be as simple as figuring out what camera angle to shoot from to as complex as what was done in Photoshop. Most photographers are happy to help and pass along information.
- LOCATION
Just as in real estate, Location, Location, Location. If you are not where the colors are, it is kind of hard to shoot them 🙁 Some years ago, I did a workshop with a well known photographer who’s writing I liked. The workshop was a bust and wasted $$$ as he didn’t know where to go to get the shots. If you are going to take the time to go shoot fall colors, either know where to go, or go with someone who does. You will be a lot happier.
Morning after Sunrise. Fall colors around a water fall - LIGHT
To get the spectacular photos that we see around it is among other things, a matter of getting the right light. Traditionally, landscape photography calls for low angle light or diffuse lighting from clouds and overcast. Low angle light, morning and evening, definitely give side lighting. This light is also yellower than high noon and tends to bring out the colors. This is why we get up before sunrise and return after dark. Diffuse lighting tends to make the colors richer; there isn’t glare and so the variations in color tend to show better. So much for tradition! Backlit photos can be quite high impact, however it doesn’t work for broad vistas where you need the side lighting. Traditional lighting often calls for the sun at the back of the photographer. For fall colors this is often the worst lighting; the colors look flat. - Camera Setup
Let’s break it down to several different components:- Metering: Use Matrix or Evaluative metering as the default. You can change to center weighted if you want to experiment.
- ISO: Choose a low ISO (50, 100, 200). You will typically get the least noise, highest natural contrast, richest colors.
- Aperture Usually the need and the desire is maximum depth of field. Assuming that this is what you want, then an aperture of f/11 to f/22 usually works well.
- Shutter Speed Nearly always the camera will be on a tripod (or should be), so speed is in some sense dictated by the ISO and aperture. However ! some times mother nature doesn’t agree, and there is a breeze rippling the leaves. This is a problem ! When the breeze does blow, I up the ISO so that I can have a shutter speed of 1/400 or better.
- White Balance First, I hope that if you are serious you are shooting in raw and not jpg. If you are shooting in raw, the white balance can be set in Lightroom after the fact, but it is nicer when you look at the LCD screen and have the white balance set correctly. Now I have a cousin who is a newspaper photographer and given the deadlines, he shoots in high quality jpg. But with tripod and all, probably not a rush job. AUTO usually works well. The exception is if it is overcast, or you are in a shaded canyon. The light tends to be much bluer which makes the LCD image rather blah at best. In these cases setting the white balance to shade, or over cast will bring the color back to the images.
- to HDR or not to HDR…
The camera typically doesn’t capture the full range of colors. I use HDR and set the camera to take bracketed photos. This gives me 4 choices to choose from; the normally exposed, the under exposed that has more saturated colors, the over exposed, and the combined HDR image. Give yourself the choice and set the camera up to take the bracketed photos, and if you don’t like them delete them. - Support / Tripod / Monopod
USE support it makes a significant difference in the quality of the photos! - Point of View
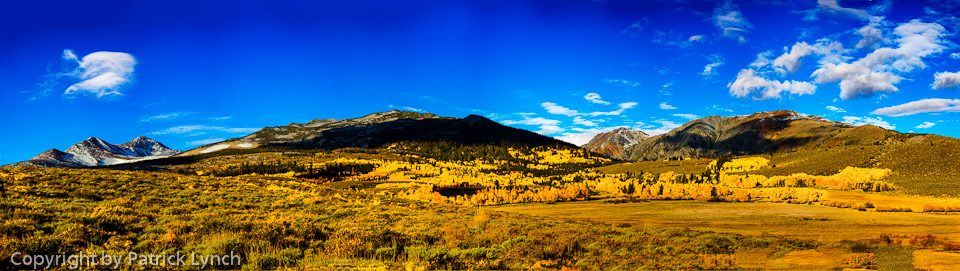
There are a number of classic views. They are classic because they produce nice looking images. See item one above. Also check out the slideshow on the top right of the page.- Vista

vista - In the trees, usually with some of the ground showing
- Back lit

Backlit - Close ups
Choose a perspective that works for your temperament. Some folks like close ups while others work for the right back lit shot.
- Vista
- Other elements to bring into the Photo.
The slideshow at the top right of this page shows several of the elements listed below. Classic elements that often make the photo include:- Water, creeks, ponds, lakes. Water appeals to the psyche.
- BLUE sky (not washed out) for contrast with the leaves
- Jagged mountain peaks
- A person for a sense of perspective
- Mist, Fog, distant rain – can add a substantial amount of moodiness to a photo
- ! Have Fun !

Having fun If you are not having fun something is wrong. This should be enjoyable. There is a bumper sticker; “The worst day of fishing is better than the best day at work”. Hopefully you can say that too about your fall colors expedition.


Agree... Leave a comment, disagree leave 2 comments